
Default Ambient Occlusion Settings
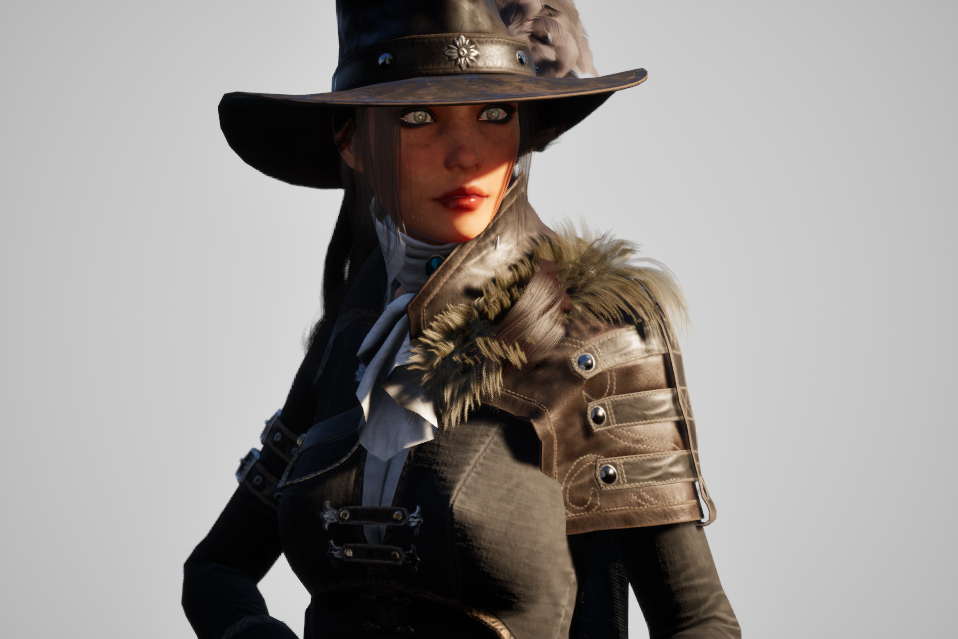
Tuned Ambient Occlusion Settings
Light Rig
The light rig consists of: 1. Skylight (no shadows) 2. Key light 3. Fill light 4. Eye light

This article is an explanation of some of Unreal's Screen Space Ambient Occlusion settings and how ambient occlusion can interact with fill lighting. This workflow is valid for Unreal 4 & 5.
Ambient occlusion is essentially the shadows cast by indirect lighting. This is a very approximate calculation that looks at a point in space, traces rays out in all directions too see if there are nearby surfaces, and then darkens the point depending how close the other surfaces are. In the case of Screen Space Ambient Occlusion, the rendering engine does this calculation based on what's seen from the camera. Objects outside the frame will not contribute to the occlusion calculation.
https://dev.epicgames.com/documentation/unreal-engine/ambient-occlusion?application_version=4.27
https://dev.epicgames.com/documentation/unreal-engine/ambient-occlusion?application_version=4.27
The ambient occlusion settings I'll be discussing are:
Intensity: The darkness of the shadows created with the occlusion.
Radius: The distance that is traced to find occluding surfaces
Power: The curve that gathers or spreads the shadow values
Bias: The distance the shadows start from the surface.

Default Ambient Occlusion Settings

Tuned Ambient Occlusion Settings
My tuned ambient occlusion settings involved
Increasing Intensity for maximum effect
Decreasing Radius to enhance depth and shape
Decreasing Power for a softer falloff
Decreasing Bias to catch more details
Decreasing Radius to enhance depth and shape
Decreasing Power for a softer falloff
Decreasing Bias to catch more details
This creates occlusions settings that help bring out more detail and depth in the model.
The Lighting Only view mode is a great place to check for shadow bias and ambient occlusion bias issues. You can see from the some of the triangle shapes on her breast, that the key light shadow bias is causing some issues. However, some of the shape would be lost if the shadow bias was increased. It's always a balance between showing the geometry accurately and reducing artifacts.
Ambient Occlusion and Fill Lighting
Generally speaking, I don't put shadows on my fill lights. This helps them cover more of the geometry and simulates a broad source of lighting. I'm also always looking out for performance issues as well, so having fewer shadow casting lights is better.
In Unreal, shadow casting lights "erase" ambient occlusion where they land, since those surfaces are directly lit. But if you use unshadowed lights, they can sometimes feel like they aren't filling enough, since the ambient occlusion might be too heavy in some areas (usually around the eyes).

Eye light and fill light not casting shadows
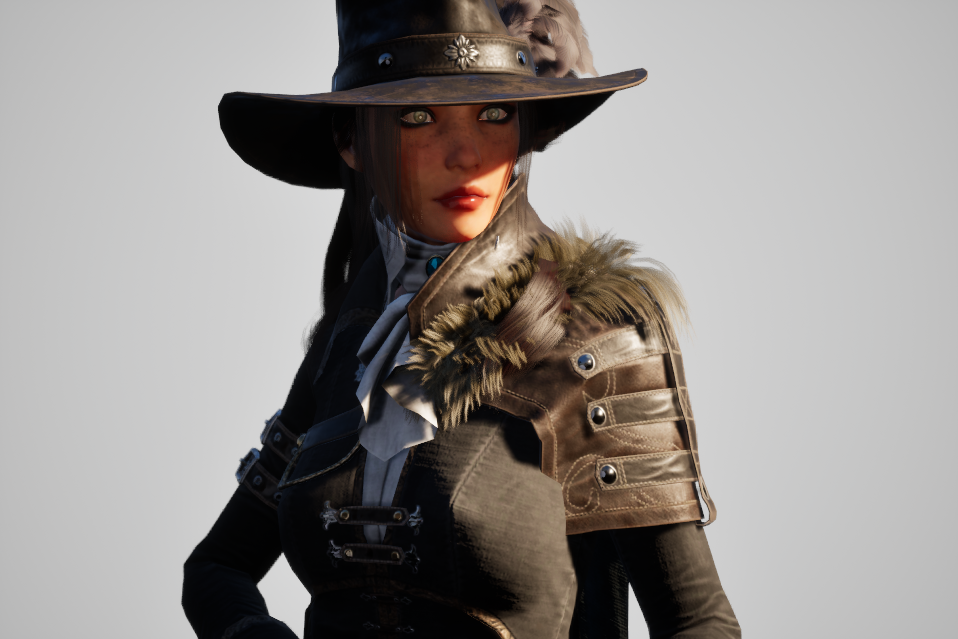
Eye light and fill light casting shadows
You can see that without shadows on the fill and eye lights (left), the character's eyes can seem a little dark. If you want to pay for the expense of shadows on the lights, they now "erase" the ambient occlusion and the character's face looks more evenly lit (right).
But what if there was another way to maintain the desired look without incurring the shadow cost?
The 0.0 Shadow Resolution Scale

In this image, the eye light is set to cast shadows, which "erases" the AO around the character's eyes, but it is set to a Shadow Resolution of 0.0, so no shadow is cast.

Default ambient occlusion

Tuned ambient occlusion and lighting
Summary
The image on the left shows the default ambient occlusion settings. These can be ok as a staring point, but often are not optimal for cinematic character framing. There is a single shadow casting key light. The fill and eye lights don't cast shadows.
The image on the right shows ambient occlusion tuned for this camera and character. The key light casts a shadow. The fill light does not cast a shadow. The eye light has shadow casting enabled, but with a shadow resolution of 0, does not cast a shadow.
Credits: Character by Quang Phan https://www.artstation.com/artwork/rAD5A2